|
|
You are here: Foswiki>AGLT2 Web>VirtuozzoInfo (16 Oct 2009, TomRockwell)Edit Attach
Virtuozzo Information and HowTo
We have been testing Virtuozzo on our new virtualization hardware. Virtuozzo runs multiple "servers" on a host system, sharing the underlying kernel while segrating the running servers from one another...it has been described as 'chroot' on steriods. The nodes involved for AGLT2 are:- umvm01.aglt2.org (also 141.211.98.39 for outside access)
- umvm02.aglt2.org (also 141.211.99.37 for outside access)
- umvmgt.aglt2.org (also 141.211.101.31 for outside access)
- umvmstor01.aglt2.org (IP not used...this is the MD3000i iSCSI storage unit which hosts the /vz container storage area).
Hardware Setup
To run Virtuozzo you must first install a "base" (host) operating system. You can pick any Redhat variant of 4 or 5. I choose to use Scientific Linux 5.2 x86_64 (64 bit) for umvm01.aglt2.org. This system has dual X5460 processors and 32GB of RAM. These systems (UMVM01/02) also have DRAC5 cards and the "Virtual Media" USB (Raritan) dongles. I first tried using the DRAC5 virtual media on UMVM01 to install from the Scientific Linux 5.2 ISO image...this failed. I then used the USB dongle virtual media and was able to complete the install. Next step was to configure all needed networking on the host. We want the base system to be as resilient as possible and so we are configuring it to use NIC Teaming to two different switches (Dell SW1 stack and Nile). The diagram of the network topology for UMVM01 is here: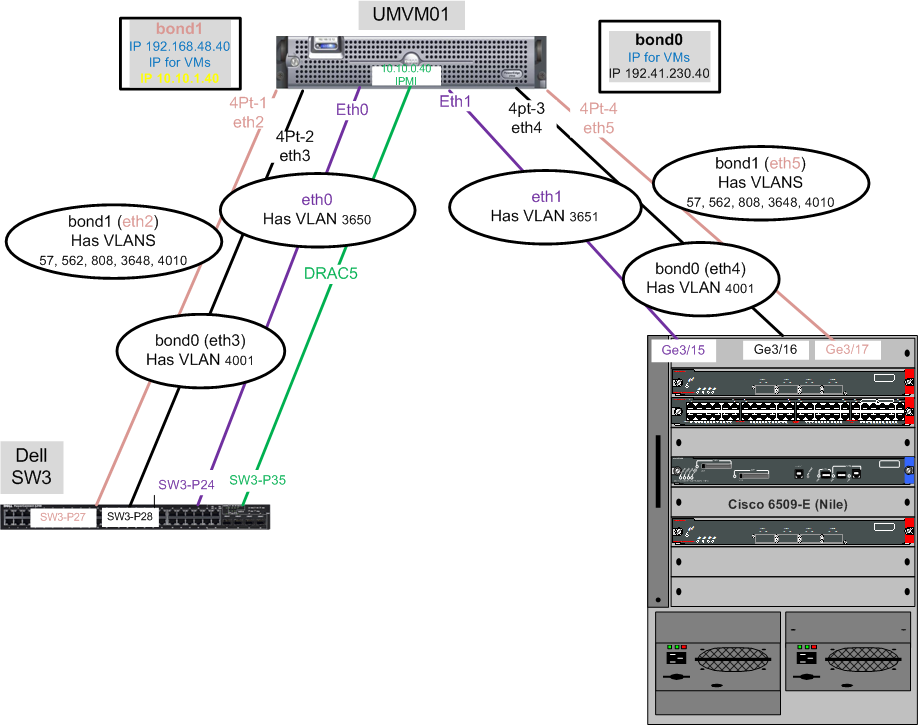
Basically we need to group network connections to allow the use of both links or just one of them if one fails. Since these Dell PE2950 systems have dual onboard Broadcom NICS and an add-in Intel quad-port GE card we need to use two different vendors NIC teaming setups.
Broadcom NIC Teaming
Intel NIC Teaming
Dell Switch Configuration
Cisco Switch Configuration
iSCSI Setup
I followed the info at http://www.performancemagic.com/Dell1950_MD3000i_Xen_Debian_iSCSI_RDAC/iSCSI.html for the iSCSI configuration part. All the networking should have been completed before doing this. The rough steps are:- Install the iscsi-initiator-utils-6.2.0.868-0.7.el5.x86_64 rpm on the host
- Run iscsiadm -m discovery -t sendtargets -p 192.16.50.100 to "discover" the MD3000i iSCSI targets
- Go to umvmgt and setup access for this new host to the iSCSI disks using the "Modular Disk Storage Manager" MDSM.
- "Login" to the iSCSI storage via _ iscsiadm -m node -l_
- Format the iSCSI area you want to use:
- For
umvm01use /dev/mapper/mpath1p1 so mke2fs -j /dev/mapper/mpath1p1 - For
umvm02use /dev/mapper/mpath1p2 so mke2fs -j /dev/mapper/mpath1p2
- For
- Add it as mount point /vz in /etc/fstab and mount it
RDAC Modules
We need to make sure we have the dm_rdac and dm_multipath modules...they are part of our kernel already.Multipath Configuration
Now that we have the modules compiled and installed, we need to setup a configuration file so that the multipath modules/daemon will choose the correct devices. Insert the following into an empty /etc/multipath.conf file.
defaults {
        udev_dir                /dev
        user_friendly_names     yes
}
blacklist {
        devnode "^(ram|raw|loop|fd|md|dm-|sr|scd|st)[0-9]*"
        devnode "^hd[a-z]"
        devnode "^sda"
        devnode "^sdb"
        devnode "^sda[0-9]"
        devnode "^sdb[0-9]"
        device {
                vendor DELL
                product "PERC|Universal"
        }
}
devices {
        device {
                vendor                  DELL
                product                 MD3000i
                hardware_handler        "1 rdac"
                path_checker            rdac
                path_grouping_policy    group_by_prio
                prio_callout            "/sbin/mpath_prio_rdac /dev/%n"
                failback                immediate
                getuid_callout          "/sbin/scsi_id -g -u -s /block/%n"
        }
}
multipaths {
        mulitpath {
                device {
                        vendor DELL
                        product MD3000i
                }
        }
}
Multipath Discovery
Now we have a configuration and modules, lets clear multipath database and re-establish the paths. To flush the database use -F and the restart the deamon. eddie:~# multipath -F eddie:~# /etc/init.d/multipath-tools restart Now run multipath with the -ll option to see if you can see the 4 paths, and that the correct hardware-handler is being used. If everything is going well you should have something similar to the following. eddie:~# multipath -llmpath1 (36001c23000c579e10000031047168fcd) dm-2 DELL ,MD3000i [size=558G][features=0][hwhandler=1 rdac] \_ round-robin 0 [prio=6][enabled] \_ 5:0:0:1 sdi 8:128 [active][ready] \_ 4:0:0:1 sdf 8:80 [active][ready] \_ round-robin 0 [prio=0][enabled] \_ 6:0:0:1 sdl 8:176 [active][ghost] \_ 3:0:0:1 sdc 8:32 [active][ghost]
Complete "Other" Installs
Typical AGLT2 Dell nodes need the srvadmin, net-snmp, syslog-ng and related software installed and configured. Do this before installing Virtuozzo.Virtuozzo Installation and Configuration
Accessing Virtuozzo on AGLT2
You can access Virtuozzo via its web interface athttps://host.aglt2org:4643/. Replace host with umvm01 or umvm02 as appropriate. Depending upon your client IP address you may need to use an alternate URL. For example https://141.211.98.39:4643/ for umvm01 if you are not on a .aglt2.org client. Alternately you can interact with Virtuozzo on the "host" command-line via vzctl commands. Some examples are shown below.
Important "HowTos" for Virtuozzo
During our testing of Virtuozzo we have found out a few important things about using and configuring it.Migration Notes for AGLT2 systems
For migrating already existing systems you need to be careful about a few things. The Virtuozzo design for migration didn't plan for "global" filesystems nor large NFS (auto)mounted areas. One of the first things a migration does is a 'du' on '/'. For either AFS or NFS mounted areas this can result in a 'du' process taking hours and timing out, failing the migration task. To prevent this we use a simple fix. On the node to be migrated we replace /usr/bin/du with a simple script which "lies" about the disk-usage:#!/bin/bash # echo "47 /"The original /usr/bin/du is just renamed to /usr/bin/du.orig. For AGLT2 there are two other issues. Our default sshd configuration may not allow 'root' logins and may not allow passwords. Before the migration you need to edit /etc/ssh/sshd_config and temporarily revert the settings to allow root logins via password. Don't forgot to undo this after the migration! The second thing is the the Virtuozzo migration uses some ports that are normally blocked by our firewall. Make sure to do 'service iptables stop' before commencing the migration. You migrate a node either from the command line or the Web GUI. It is easiest by far to use the Web GUI. The
Network Setup
Container Resource Setup
Once containers are created/migrated you need to check the resources assigned. To make sure there aren't memory resource limitations which may cause problems, verify the "Memory Management Mode" under Memory Configuration is set toSLM resource management for each container.
AFS for Containers
NFS for Containers
Diagnosing Containers
Using Multiple Virtuozzo Servers
TBD. This is not yet implemented.Contacting Virtuozzo Support
-- ShawnMcKee - 20 Aug 2008Edit | Attach | Print version | History: r23 < r22 < r21 < r20 | Backlinks | View wiki text | Edit wiki text | More topic actions
Topic revision: r23 - 16 Oct 2009, TomRockwell

Ideas, requests, problems regarding Foswiki? Send feedback