The instructions use the c6-1-24-1 (Dell C6420) as an example
Switch ports
Available ports
Look for all the switches for available portsThe c6420 nodes need 2 switch ports:
1 Gigabit (ethernet) for IDRAC and EM1(cobbler building)
1 Ten Gigabit
Ports Configuration in switch
Refer to the configurations of the other similar C6420 work nodes.
Basically, the 10Gb port needs to be setup to LCAP (bonding) model
sw1#show running-config interface ethernet 1/g18
description "c6-1-24-1 iDrac/PXE"
spanning-tree portfast
mtu 9216
switchport access vlan 4010
lldp transmit-tlv port-desc sys-name sys-desc sys-cap
lldp transmit-mgmt
lldp notification
lldp med
lldp med transmit-tlv location
lldp med transmit-tlv ex-pse
lldp med transmit-tlv ex-pd
lldp med transmit-tlv inventory
sw23#show running-config interface tengigabitethernet 1/33
!
interface TenGigabitEthernet 1/33
description "c6-1-24-4 Phys1"
no ip address
!
port-channel-protocol LACP
port-channel 79 mode active
!
protocol lldp
advertise dot1-tlv port-protocol-vlan-id port-vlan-id
advertise dot3-tlv max-frame-size
advertise management-tlv management-address system-capabilities system-description system-name
advertise interface-port-desc
advertise med
no shutdown
sw23#show running-config interface port-channel 79
!
interface Port-channel 79
description "c6-1-24-4"
no ip address
mtu 9216
portmode hybrid
switchport
no shutdown
sw23#show running-config interface vlan 4001
!
interface Vlan 4001
description "AGLT2_Public"
no ip address
mtu 9216
tagged TenGigabitEthernet 1/14
tagged Port-channel 1-13,23,36-41,61-80,83
untagged Port-channel 31,88-89
no shutdown
sw23#show running-config interface vlan 4010
!
interface Vlan 4010
description "AGLT2_Private"
no ip address
mtu 9216
tagged TenGigabitEthernet 1/14
tagged Port-channel 23,31,88-89
untagged Port-channel 1-13,36-41,61-80,83
no shutdown
IP addresses
Refer to this document to decide what IP addresses are available
One work node requires 3 IP addresses:
10.10.1.X or 10.10.2.X for private IP
10.10.0.X or 10.10.3.X for IDRAC cards
192.41.230.X or 192.41.231.X for public IP
We normally use the same X in the above IP addresses to keep the consistency.
All the 10.10.[0-3].X belong to vlan 4010
All the 192.41.[230-231].X belong to vlan 4001
DNS
Local DNS
Local DNS is added from CFEngine, then dns server(dns.aglt2.org) gets the update from cfengine
add to /masterfiles/stash/dns/named/0.10.10.in-addr.arpa.domain
209 PTR rac-c6-1-24-1.local.
209 PTR c6-1-24-1.local.
c6-1-24-1 A 10.10.1.209
rac-c6-1-24-1 A 10.10.0.209
Public DNS
Public DNS is requested from Merit (need to register to membership and be authorized)
https://web.merit.edu/portal/login.epl
CFEngine updates
Add the name pattern of the new work nodes to /masterfiles/inputs/promises.cf "UMT2WN"
comment => "UM Tier2 worker nodes",
or => {
"um_dc",
\x85.
classmatch("c6_1_.*"),
...
};
"WN_56Core_10G"
comment => "The new C6420-class machines with 10Gb NICs",
or => {
classmatch("c6_1_.*"),
classmatch("c6_2_.*"),
\x85.
};
System Setup Configuration
Notes:In order to do the system setup, the machine has to be connected to KVM.
The idrac/em1 mac address is available from the tag in the end of the machine, but the mac address for p3p1/2 can only be got from the \x93Device Settings\x94
The C6420 has idrac and em1 sharing the same physical interface(one RJ45 interface), but having 2 different mac addresses.
Press F2 to enter system setup
Settings include :
- BIOS Boot Settings
- IDRAC Settings (configure IP for IDRAC card)
- Device Settings RAID (configure virtual disk )
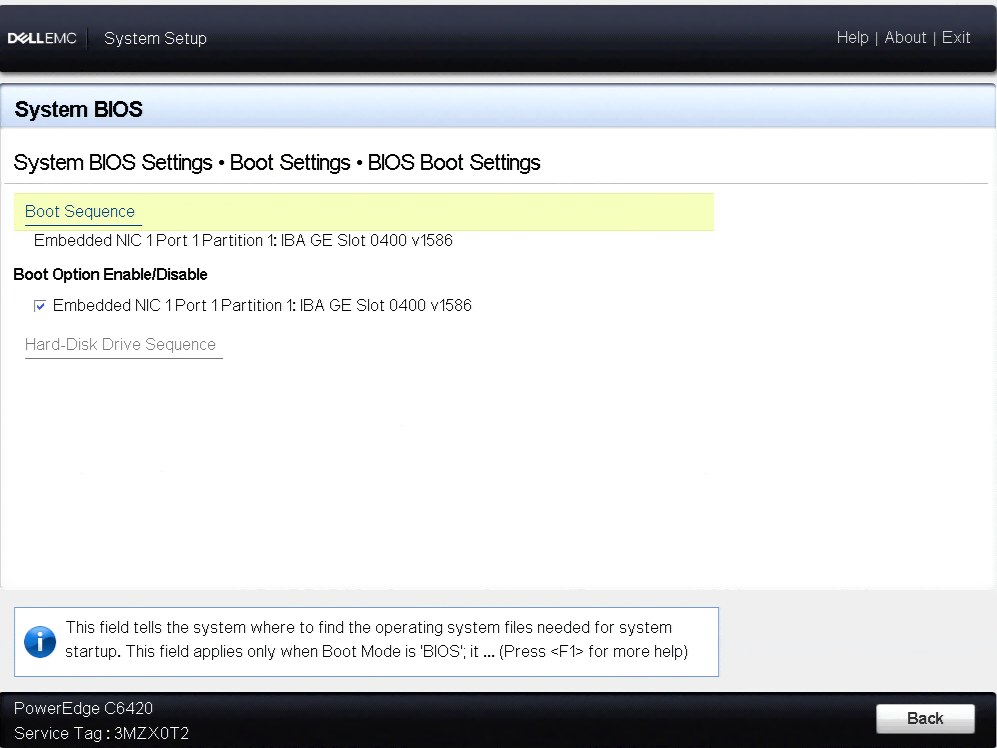
1) System BIOS->Boot Settings
Boot Mode: BIOS
Boot Sequence Retry: Disabled
Hard-Disk Failover: Disabled
Note: It is important to set Boot Model to BIOS, otherwise, the DHCP does not work!

2) IDRA Settings->Network
Register DRAC on DNS: Disabled
DNS DRAC name: rac-c6-3-11-4
Autoconfig Domain Name: Disabled
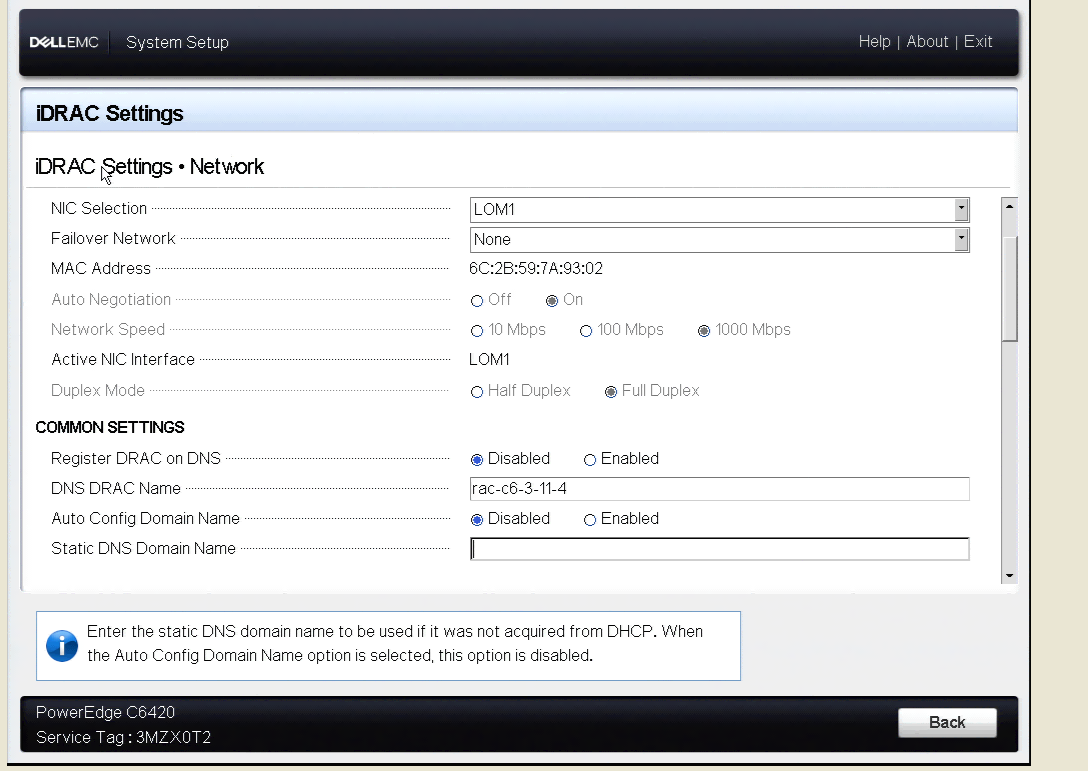
IP V4 Settings:
Enable DPHC: Disabled
Input IP/gateway/Subnet Mask/DNS

IPMI SETTINGS:
Enable IPMI Over LAN: Enabled
VLAN SETTINGS:
Enable VLAN ID: Disabled
3) Device Settings->Raid Controller
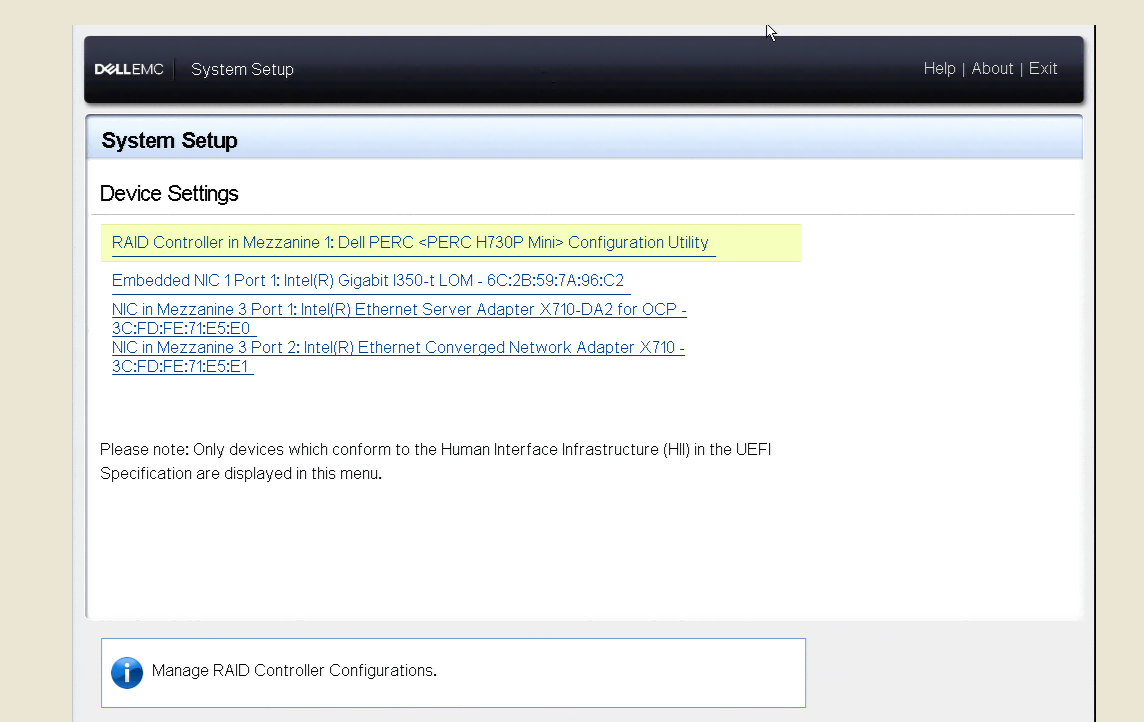
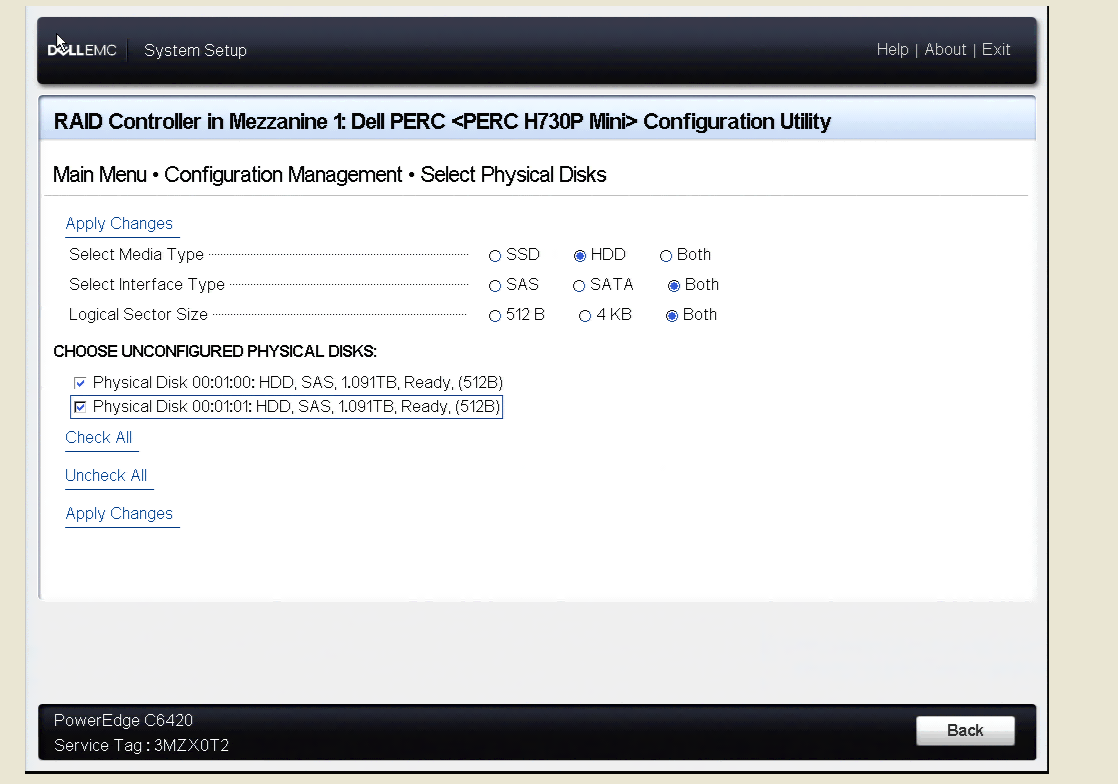
Configuration Management-> Convert to Raid Compatible
Select both physical disks, and confirm, then return to the Configuration Management Page

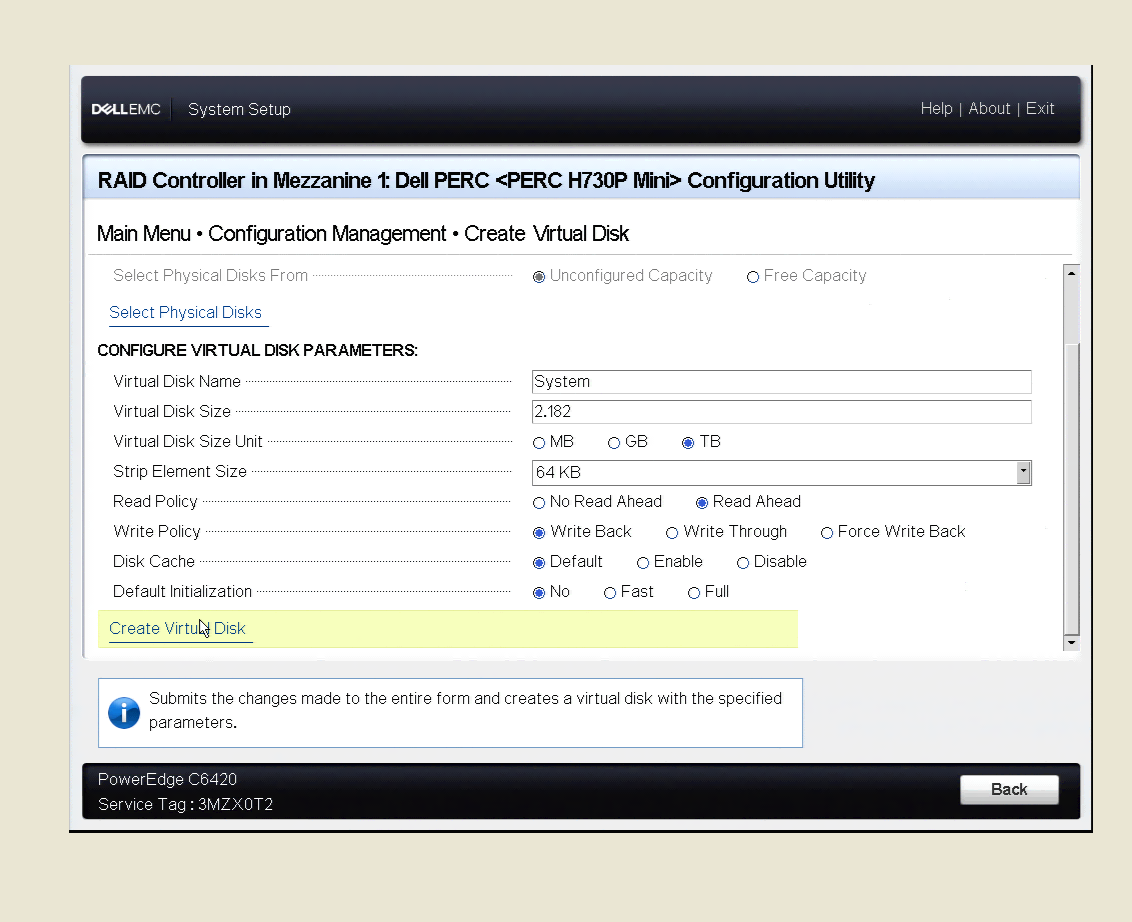
Configuration Management->Create Virtual Disk

Select Raid Level: RAID0
Select Physical Disk: Enter to select both pdisks, and click \x93Apply Changes\x94
Return to the previous page(create virtual disk):
Virtual Disk Name: System
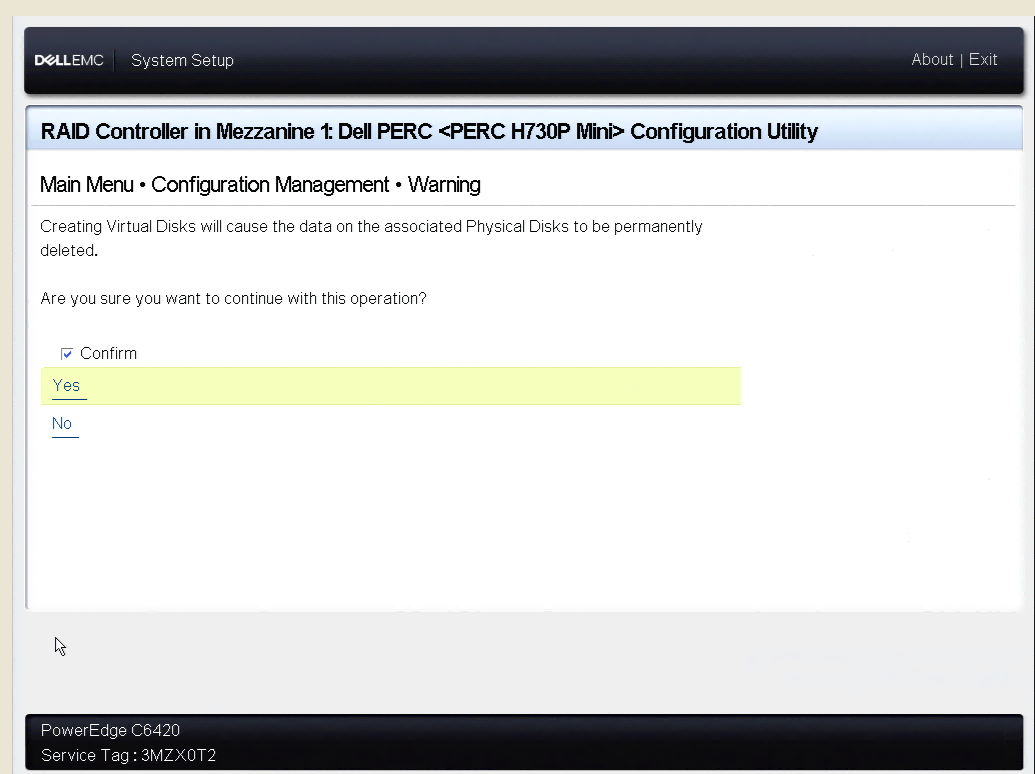
Click \x93Create Virtual Disk\x94, it opens another page, and select \x93Confirm\x94, and click on \x93Yes\x94, it returns to the previous page(create virtual disk)
Verify Virtual Disk Settings:
Return to the Raid Device configuration page: Choose \x93Virtual Disk Management\x94 to verify the virtual disk setup (We use Raid 0 over 2 Pdisks to create this Vdisk, it is total capacity is the sum of the 2 pdisks, 2.4TB)
Console Access without KVM
After setting the idrac, the console should be available through
http://idrac_ip (http://10.10.0.209)
The default login is root/calvin
Password is required to be reset after the initial login
Reboot the Machine
It should start building through PXE boot
Operations After Building
Execute the following commands:
sh /root/tools/rsync-certificates.sh
systemctl start lustre_umt3
omconfig system esmlog action=clear
sh /etc/check.sh
systemctl start condor
Cobbler system profile creation
1. Through the cobbler web interface, choose the system profile of a similar node, and copy, then rename the copy to the new work node name(c6-1-24-1)
2. In Edit model, updating
General->Netboot Enabled (checked)
Networking(Global)->Hostname
Networking->bond0 (IP, subnet mask), bond0.4001(IP, subnet mask), em1(mac,subnet mask, check static), p3p1(mac), p3p2(mac)
3. Push cobbler sync
4. The c work nodes need dynamical IP pool from DHCP, on the cobbler server, after
cobbler sync, run /root/tools/dhcp_reset.sh
[root@sysprov02 tmp]# more /root/tools/dhcp_reset.sh
#!/bin/sh
## This script allows dynamical IP allocation to the dhcp client, this is necessary to build all the C work nodes (the bl- work nodes do not require this)
sed -i -e 's/\#range dynamic-bootp/range dynamic-bootp/' /etc/dhcp/dhcpd.conf
systemctl restart dhcpd
Update various machine lists
Adding the new work nodes to various places in /atlas/data08/manage/cluster [root@umt3int03 cluster]# grep -r c6-1-24-1 *
machines/Condor_UM-machines.txt:c6-1-24-1.local
machines/Condor_nodes-machines.txt:c6-1-24-1.local
machines/WN_SL7_All-machines.txt:c6-1-24-1.local
machines/Condor_All-machines.txt:c6-1-24-1.local
machines/c6-machines.txt:c6-1-24-1.local
machines/dc_All_machines.txt:c6-1-24-1.local
machines/WN_SL7_UM-machines.txt:c6-1-24-1.local
nodeinfo.csv:"c6-1-24-1","c6-1-24-1","local","ShortQue","YES","YES"
nodeinfo.localNames:"c6-1-24-1"
Ideas, requests, problems regarding Foswiki? Send feedback